Preventive and corrective maintenance on the FR80 and 5010 is carried out
under contract by the III Service Engineer. The contract provides for
a 4-hour period of maintenance during prime shift. Work arranged outside
prime shift attracts a surcharge (see FR80 Operator Notice 1).
Some maintenance is part of the operators' function. This includes tape
deck and camera cleaning. The following procedure should be adhered to:
Avoid excessive use of alcohol, especially around roller bearings, where
ingress of alcohol will dilute bearing lubricant.
Lenses and the PLS can be irreparably damaged by scratches or retained
finger marks which contain acid that can etch into the optical coating.
These surfaces should be cleaned in the following order:
Vacuum hose to remove large debris such as film chips.
Lens brush to remove dust.
Lens tissue (or Kleenex - not Kimwipes as they are too hard) and
lens cleaning fluid to remove finger marks.
Then use dry tissue to remove any trace of alcohol.
Use a Q-Tip moistened with alcohol to clean EOT sensor light.
Use tissue to remove dust from ledges around tape drive and door.
2.2 Cleaning 5010 Film Processor
Clean all squeegees and rollers with damp sponge.
Top-up replenishment tanks as required.
3. EVERY TIME FILM CASSETTE IS LOADED
3.1 Film cassettes
These are to be brushed out lightly (using squirrel-hair brush) to remove
any dust, film chips, etc. Check that no hair from the brush is lodged
into any part of the cassette.
3.2 Rollers
Rollers on the cassettes are to be cleaned with a Q-Tip moistened with
alcohol.
3.3 Hardcopy
The rubber rollers on the camera are to be wiped down with a damp sponge
before a fresh roll of paper is loaded.
The cassette is to be brushed out before loading a fresh roll of paper.
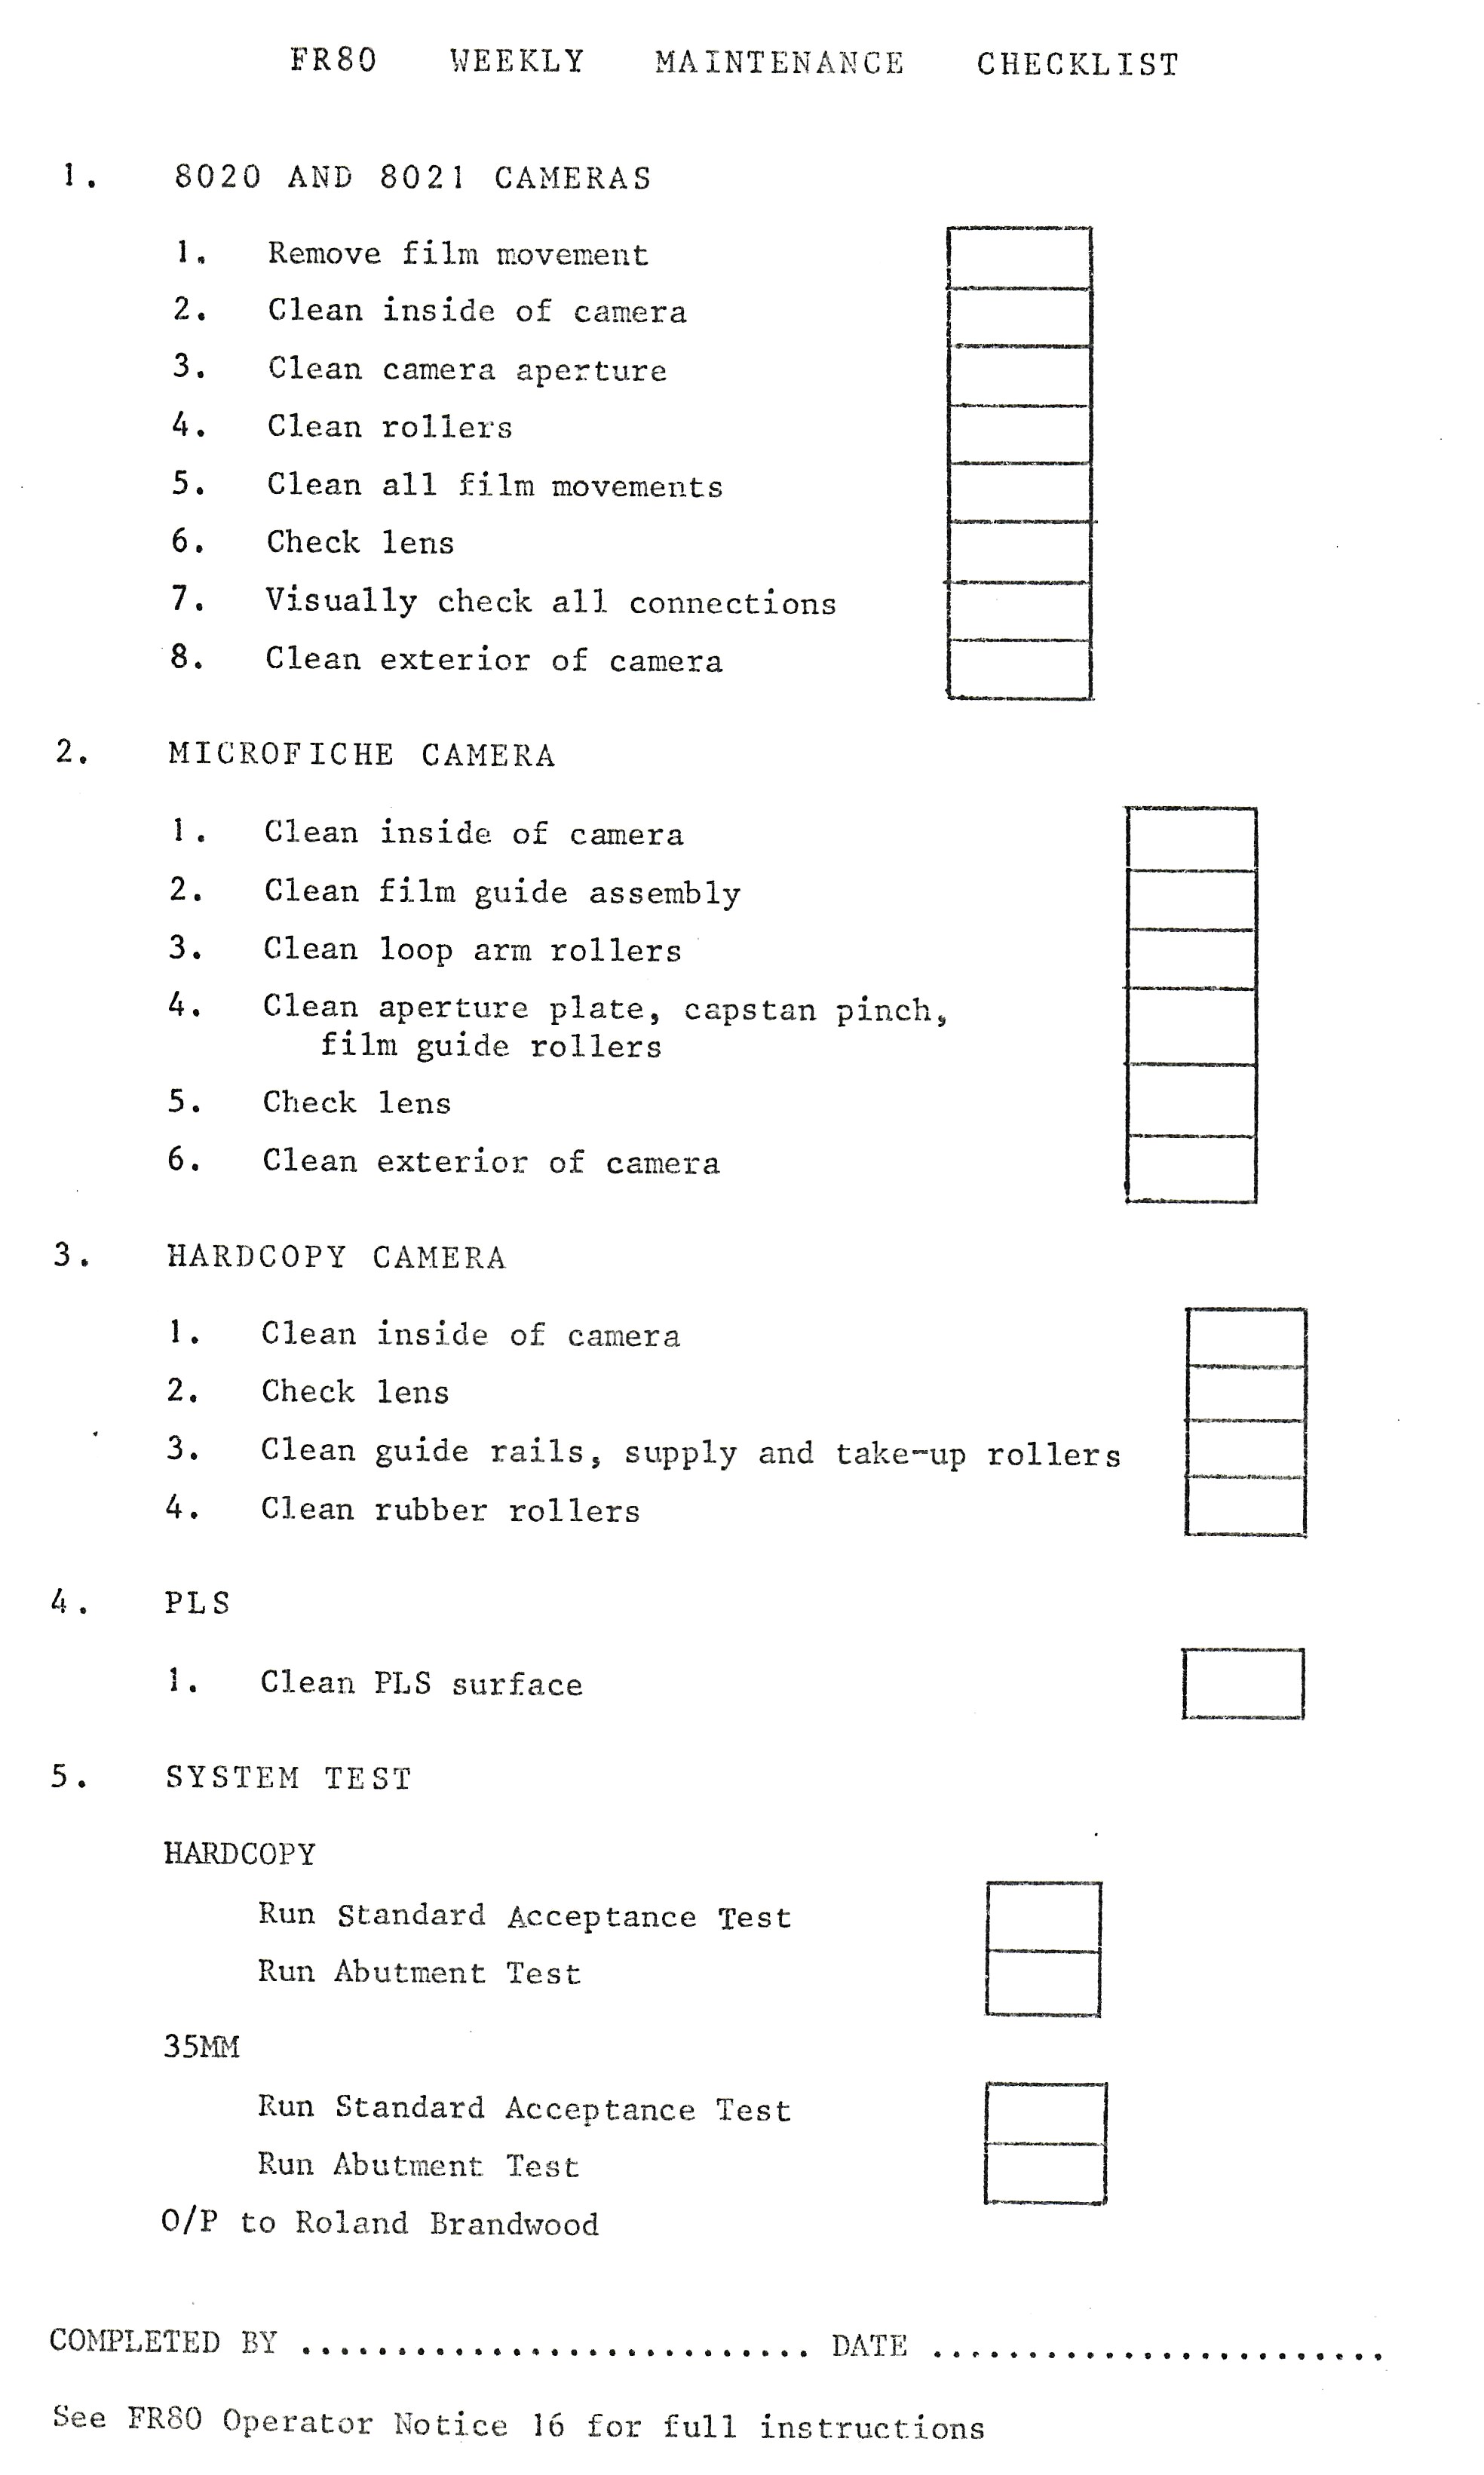
4. EVERY WEEK
The following is to be completed every Monday
(or the first day shift in the week).
4.1 Cleaning 8020 35/16mm combined camera and 8021 16mm camera
Place the camera in an area away from the PLS.
Remove film movement.
Clean inside of camera housing with squirrel-hair brush to remove dust and film chips.
Clean camera aperture with lens brush.
Clean all metal rollers and film guides with a wiper moistened with alcohol, then use dry tissue to remove any trace of alcohol.
Clean film movement, open the gate and clean the complete film path with tissue moistened with alcohol, remove any trace of alcohol with dry tissue.
Check the lens. Normally it will not need cleaning but if it does it
should be brushed lightly with lens brush - NOT with brush used for
cleaning out camera.
Visually check for any damage or loose connections.
Use a tissue moistened with alcohol to remove dust from exterior of camera.
4.2 Cleaning the Microfiche camera
Place the camera in an area away from the PLS.
Clean inside of camera housing to remove dust or film chippings; the vacuum hose may be used BUT it should not come into contact with the lens.
Place both loop arms in the latched (vertical) position, then hold left film guide assembly open and clean all points of film contact with wiper moistened with alcohol; repeat with right film assembly.
Clean both loop arm rollers and place them in horizontal position.
Place carriage in mid-position, open aperture gate and remove aperture plate. Clean the capstan, pinch and film guide rollers with wiper moistened with alcohol. Clean the aperture plate with wiper moistened with alcohol and then replace the aperture plate.
Check the lens. Normally it will not need cleaning but if it does it should be brushed lightly with lens brush - NOT brush used for cleaning the camera out.
Wipe the exterior of camera with wiper moistened with alcohol.
4.3 Cleaning the Hardcopy Camera
Remove dust from inside of the camera. The vacuum hose may be used for this but care must be taken not to scratch the lens.
Check the lens. Normally it will not need cleaning but if it does, it should be lightly brushed with a lens brush - NOT the brush used for cleaning out the cameras.
Open the top lid, clean guide rails, supply and take up rollers, wrap rollers using wiper moistened with alcohol.
Clean rubber rollers with damp sponge, to remove dust.
4.4 Precision Light Source
The camera hat is to be wiped with a tissue moistened with alcohol.
Use vacuum hose to remove any particles from the PLS face, taking
care not to scratch the surface. If any dust remains remove with the lens brush.
After this, any remaining marks, eg finger marks, should be cleaned off using
lens tissue and lens cleaning fluid.
5. SYSTEM TEST
(1) Hardcopy
Run Standard AT using program HF;FRFO and ROTATION/1, TAPE/8.
Run Abutment Test using program MON;SYS and CAM/16, PULL/3150, ABUT/12400,1,12410.
(2) 35mm
Run Standard AT using program RF;FRFO and ROTATION/1, TAPE/8.
Run Abutment Test using program MON;SYS and CAM/3, PULL/4, ABUT/12500,1,12520.
A checklist for the weekly maintenance is to be used as a
guide (sample attached). This should be completed and returned to R Brandwood
with the output.